Focusing on the sensory contrast of crispy exterior and tender interior, I aim to master the subtle art of balancing heat and timing to achieve scallops that are perfectly caramelized on the outside while remaining juicy inside. This approach highlights the importance of patience and attention to detail, transforming a simple sear into a moment of culinary mindfulness.
Cooking scallops this way isn’t just about technique; it’s about tuning into what they tell you. The moment they hit the hot pan, you can almost hear their tiny sizzle, signaling that you’re on the right track. Getting that perfect golden crust feels like a quiet victory, a small but satisfying reminder of how simple ingredients can turn into something special with just a bit of care.
Focusing on the sensory contrast of crispy exterior and tender interior, I aim to master the subtle art of balancing heat and timing to achieve scallops that are perfectly caramelized on the outside while remaining juicy inside. This approach highlights the importance of patience and attention to detail, transforming a simple sear into a moment of culinary mindfulness.
The delicate balance of searing
- There’s a quiet joy in watching each scallop develop that perfect golden crust, like tiny edible trophies.
- Sometimes, I forget how satisfying it is to get the timing just right — crispy outside, tender inside — it’s a small thrill.
- Cooking scallops reminds me to slow down and focus; it’s about patience and paying attention to every sizzle.
- I love the chaos of searing — the smell of caramelizing butter, the crackle, and that fleeting moment of perfection.
- Sharing these with friends feels like a small celebration; they appreciate the simple elegance of well-seared scallops.
The story behind this recipe
- Searing scallops always takes me back to a small seaside town where my grandmother used to cook them on weekends. Watching her handle these delicate creatures with patience and a quick flick of her wrist made me realize that the magic is in the details, not just the ingredients.
- One afternoon, she told me that the key is honoring the scallop’s natural sweetness, letting the caramelization do the work. It’s a simple lesson but one I carry into my kitchen every time I reach for these shells.
- That memory fuels my obsession with perfecting the sear — aiming for that crispy, golden crust and tender inside. It’s a humble dish, but it’s also a quiet homage to those quiet, sun-drenched afternoons with her.
Contextual origin, trivia, or history
- Pan-searing scallops became popular in French cuisine, especially in coastal regions where fresh seafood is abundant.
- The technique of searing seafood on high heat to develop a crust dates back centuries, with variations across Mediterranean and Asian cuisines.
- Scallops were once considered a luxury item, often reserved for special occasions among European aristocracy, thanks to their delicate flavor and precious nature.
- In the 20th century, advances in refrigeration made fresh scallops more accessible, fueling the popularity of quick searing methods in home kitchens.
- The word ‘scallop’ comes from Old French ‘escalope,’ meaning a thin slice of meat, reflecting its culinary versatility.
Key ingredients and tips
- Fresh scallops: I look for those with a slightly translucent, firm texture and a sweet, briny aroma—this is your best bet for a juicy sear. If yours smell off or feel slimy, find a different batch.
- Salt: I prefer sea salt; it helps draw out moisture and enhances the natural sweetness. Too much salt can overpower, so sprinkle sparingly before searing.
- Pepper: Freshly ground black pepper adds a sharp kick. I like to add it right before searing to avoid burning, which can turn it bitter.
- Butter: I use unsalted, as it allows better control over saltiness. The aroma of nutty, caramelized butter just before flipping is my signal to watch closely.
- Oil: I lean towards a high-smoke-point oil like grapeseed or clarified butter. You want a crackling sound when the scallops hit the pan—this means the crust is forming.
- Lemon: Brightens up the dish; I zest a little before cooking and squeeze fresh just before serving for that zippy, fresh flavor.
- Herbs (optional): A sprig of thyme or parsley can add a fresh, aromatic note if you like. I usually toss them in at the end for a quick herbal punch.
Spotlight on key ingredients
Seafood:
- Fresh scallops: I look for those with a slightly translucent, firm texture and a sweet, briny aroma—this is your best bet for a juicy sear. If yours smell off or feel slimy, find a different batch.
- Salt: I prefer sea salt; it helps draw out moisture and enhances the natural sweetness. Too much salt can overpower, so sprinkle sparingly before cooking.
- Pepper: Freshly ground black pepper adds a sharp kick. I like to add it right before searing to avoid burning, which can turn it bitter.
Dairy and citrus:
- Butter: I use unsalted, as it allows better control over saltiness. The aroma of nutty, caramelized butter just before flipping is my signal to watch closely.
- Oil: I lean towards a high-smoke-point oil like grapeseed or clarified butter. You want a crackling sound when the scallops hit the pan—this means the crust is forming.
- Lemon: Brightens up the dish; I zest a little before cooking and squeeze fresh just before serving for that zippy, fresh flavor.
Notes for ingredient swaps
- Seafood-Free: Use firm tofu slices; they’ll absorb the sear and provide a similar texture, but won’t have that sweet, briny flavor.
- Dairy-Free: Swap butter for coconut oil; it adds a subtle sweetness and rich aroma, though it might slightly alter the caramelization.
- Gluten-Free: Use a light coating of cornstarch instead of flour to help crisp the scallops without gluten, giving a crunchier exterior.
- Low-Sodium: Opt for unsalted butter and skip added salt; you’ll rely more on seasoning at the end to control saltiness.
- Vegan: Try nutritional yeast mixed with a little olive oil as a finishing touch; it offers a savory, cheesy note, but won’t crisp like butter.
- Citrus Variations: Replace lemon with lime or orange zest for a different bright, zesty flavor profile that complements the sweetness.
- Oil Choices: Use avocado oil for a milder, high-smoke-point alternative that imparts a more neutral flavor during searing.
Equipment & Tools
- Heavy skillet: Provides even heat for a crisp sear.
- Tongs: Turns the scallops gently without breaking them.
- Paper towels: Drys the scallops thoroughly for better browning.
- Spatula or small spoon: Baste the scallops with melted butter.
Step-by-step guide to pan searing
- Gather all equipment: a heavy skillet (preferably cast iron), tongs, a small spoon, and paper towels for drying.
- Pat the scallops dry thoroughly with paper towels; moisture is the enemy of a good sear. Let them sit out for 10 minutes if refrigerated.
- Season the scallops generously with sea salt and a little freshly ground black pepper just before cooking. Avoid pre-salting too far in advance to prevent excess moisture.
- Heat the skillet over medium-high heat until it’s just about to smoke—around 190°C (375°F). Add a high-smoke-point oil like grapeseed, just enough to coat the bottom.
- Carefully place the scallops in the hot pan, spaced apart. Do not overcrowd; cook in batches if needed. Hear the crisp crackle as they hit the pan—this is your cue.
- Sear for about 2 minutes without moving them, until the underside develops a deep golden-brown crust. Use tongs to check: they should lift easily and look caramelized.
- Flip the scallops using tongs or a small spatula. Add a knob of butter and a sprig of thyme or parsley if using, then baste the scallops with the melted butter for flavor and shine.
- Cook for another 1-2 minutes, until the other side is also golden and the scallops are just firm to the touch. They should jiggle slightly but not feel rubbery.
- Remove from heat promptly. Rest on a plate for 1 minute to allow juices to redistribute, then serve immediately with a squeeze of lemon.
- Finish with a quick drizzle of lemon juice or a sprinkle of herbs before plating for brightness.
Let the scallops rest briefly on a warm plate for a minute. Finish with a squeeze of lemon or herbs. Serve hot to preserve the crisp crust and tender interior.
How to Know It’s Done
- Crust: The scallops should have a deep amber, crispy exterior.
- Texture: When pressed lightly, they should feel firm but not rubbery.
- Appearance: Juices should be clear, not cloudy or milky, indicating freshness and proper searing.
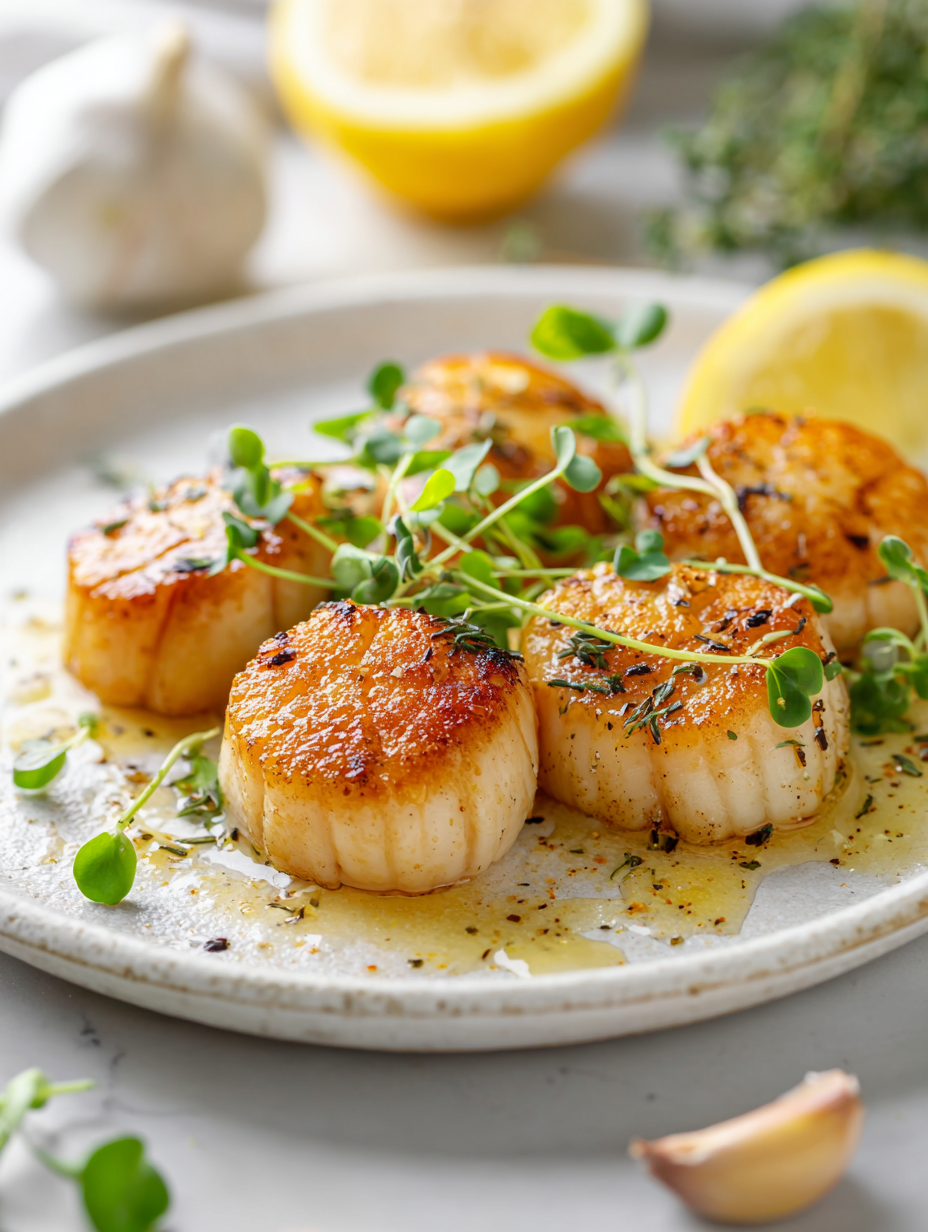
Perfectly Seared Scallops
Ingredients
Equipment
Method
- Pat the scallops dry thoroughly with paper towels to remove excess moisture, which helps achieve a crisp sear. Let them sit out for about 10 minutes if refrigerated.
- Sprinkle the scallops generously with sea salt and freshly ground black pepper just before cooking. This enhances flavor and helps draw out moisture for better browning.
- Heat your heavy skillet over medium-high heat until it’s just about to smoke. Add the high-smoke-point oil, swirling to coat the bottom evenly.
- Carefully place the scallops in the hot pan, spacing them apart. You should hear a lively crackling sound as they hit the pan, signaling that the crust will start forming.
- Let the scallops sear undisturbed for about 2 minutes until the underside develops a deep golden-brown crust. Use tongs to gently lift one to check the color.
- Flip each scallop carefully using tongs or a small spatula. Add the butter and lemon zest to the pan, then tilt the skillet to spoon the melting butter over the scallops—this basting adds flavor and shine.
- Cook the scallops for another 1-2 minutes until the second side is also golden and the scallops feel firm but still slightly springy when pressed. The interior should be tender and juicy.
- Remove the scallops from the pan and let them rest for about 1 minute on a warm plate. This allows the juices to redistribute for maximum tenderness.
- Squeeze fresh lemon juice over the scallops and drizzle with any remaining butter and herbs if using. Serve immediately to enjoy the crispy exterior and tender interior.
Notes
Pro tips for perfect scallops
- Preheat thoroughly: Make sure your pan is hot enough—almost smoking—before adding scallops for that perfect sear.
- Dry scallops completely: Pat them dry with paper towels—moisture prevents browning and creates steam.
- Use high-smoke-point oil: Grapeseed or clarified butter helps achieve a crispy crust without burning.
- Avoid overcrowding: Cook in batches if necessary; overcrowding lowers pan temperature, leading to soggy scallops.
- Don’t move too soon: Let the scallops develop a deep golden crust, about 2 minutes, before flipping.
- Baste with butter: Add butter after flipping, then spoon over scallops for richness and a glossy finish.
- Rest briefly after cooking: A minute off the heat helps juices redistribute, ensuring tender, juicy bites.
Common mistakes and how to fix them
- FORGOT to dry scallops thoroughly → Pat dry for better searing.
- DUMPED salt too early → Salt just before cooking, to prevent excess moisture.
- OVER-TORCHED butter → Reduce heat if butter burns, and add later for flavor.
- MISSED resting step → Rest scallops 1 minute before serving to keep juices in.
Quick fixes and pantry swaps
- If scallops are sticking, splash a little more oil and let the pan heat up longer.
- When scallops are overcooked and rubbery, immediately remove and serve with a fresh squeeze of lemon.
- Dumped too much salt? Rinse scallops quickly and pat dry before searing again.
- When the butter burns, lower the heat and add a splash of oil to prevent bitterness.
- Shield scallops from uneven heat by rotating the pan or adjusting heat sources to avoid uneven browning.
Prep, store, and reheat tips
- Pat scallops dry thoroughly with paper towels before storing; this prevents excess moisture and helps achieve a good sear later. Store in an airtight container for up to 24 hours in the fridge.
- If you need to prep the scallops in advance, do so up to 24 hours ahead. Keep them covered and refrigerated; avoid marinating or salting too early to prevent water loss and sogginess.
- Refrigerated scallops should be cooked within a day for optimal freshness. The longer they sit, the more the texture can deteriorate and flavor diminish.
- To reheat cooked scallops, gently warm them in a hot skillet for about 30 seconds per side or until just heated through. Be cautious—overheating makes them rubbery and dulls their delicate flavor.
- For leftovers, store in an airtight container in the fridge for up to 1 day. Reheat carefully to preserve their tender texture and avoid overcooking, which can turn them chewy and tough.
Top questions about pan seared scallops
1. Why won’t my scallops brown properly?
Use dry, fresh scallops and pat them thoroughly with paper towels. Moisture prevents browning and creates steam, so drying is key for that perfect crust.
2. How hot should the pan be?
Make sure your pan is hot enough—almost smoking—before adding scallops. A hot pan ensures a crispy exterior and quick sear.
3. Can I prepare scallops ahead of time?
Pat scallops dry, season just before cooking, and avoid overcrowding the pan. These steps help achieve even, golden searing without steaming.
4. How long do I cook scallops?
Cook scallops for about 2 minutes per side until deep golden, then remove from heat and rest for a minute to keep juices in.
5. Which oil is best for searing scallops?
Use high-smoke-point oils like grapeseed or clarified butter. They resist burning and help develop a crisp crust without bitterness.
6. What if my scallops stick or overcook?
If scallops are overcooked or rubbery, remove immediately, and if they stick, splash more oil and let the pan heat longer before researing.
7. How do I add flavor at the end?
Finish with a squeeze of fresh lemon or herbs to brighten the flavor. Baste with butter during cooking for added richness and shine.
8. Can I reheat cooked scallops?
Reheat scallops gently in a hot skillet for 30 seconds per side. Avoid microwaving, which makes them tough and rubbery.
9. How long can I store scallops?
Store raw scallops in the fridge up to 24 hours. For leftovers, keep in an airtight container and reheat gently to avoid losing tenderness.
10. What should I look for in good scallops?
Use fresh, high-quality scallops with a sweet, briny aroma and firm texture. Avoid those with a fishy smell or sliminess for best results.
Cooking these scallops reminds me how a few simple steps can turn seafood into something special. The smell of caramelized butter and that crisp exterior still makes me smile, even after many tries.
They’re perfect for a quick, impressive dinner or a small celebration. Taking the time to get that sear just right feels like a quiet win—something worth savoring in every bite.

Hi, I’m Emma Collins, the recipe developer and writer behind Sailing With Seasons. I’m so happy you’ve found your way here. This blog is my celebration of seasonal ingredients, simple cooking, and the quiet joy that comes from preparing food with intention. Sailing With Seasons is where I share the recipes, lessons, and kitchen rituals that have shaped my life. It is a space built on curiosity, care, and a deep respect for real ingredients.
Leave a Reply