Hell’s Kitchen Mac and Cheese isn’t about polished perfection. It’s about the chaos — the frantic boiling, the bubbling cheese, the moments when you’re racing against time just to get something warm and gooey on the table. This dish is raw, honest, and a little rough around the edges, much like a busy kitchen’s heartbeat.
I learned to make this under pressure, scribbling notes as the timer ticked down, heat blazing, and pots rattling. It’s my go-to when I need comfort that’s quick and honest, no fancy tricks, just good old-fashioned indulgence with a punch of edge. It’s the kind of meal that reminds you sometimes, the beauty is in the mess.
Focusing on the chaotic beauty of a rushed kitchen, this recipe captures the raw, unpolished moments that happen when you’re trying to get comfort food on the table fast, with a pinch of edge and a splash of sweat—hell’s kitchen style.
Kitchen Chaos Meets Comfort
- This recipe reminds me of late nights in the kitchen, the chaos, the clang of pots, and that rush of adrenaline as everything comes together just in time.
- Making this dish always takes me back to my first fiery attempt, when I realized that comfort food doesn’t have to be perfect, just honest and bold.
- I find a strange kind of pride in how raw and unpolished this mac and cheese is—like a badge of honor for every rushed, noisy dinner I’ve ever survived.
- There’s a rush of relief every time I get it on the table, hot, cheesy, and slightly chaotic, just like those hectic nights I learned to love cooking in.
- Despite the mess, I feel a deep sense of nostalgia—this dish’s imperfect, messy vibe is exactly what makes it so real and comforting.
Kitchen Chaos Meets Comfort
- This recipe came about during one of those nights in the kitchen where everything feels chaotic but you still want something rich and satisfying. I was rushing to get dinner on the table after a long day, and I realized that embracing the mess — the cheese bubbling over, the pasta clumping together — makes for the best comfort food. It’s honest, unpolished, and full of raw energy, just like a real kitchen should be.
- I’ve always loved how a dish like this can become a kind of chaos therapy — a way to channel the frantic energy into something warm and indulgent. It’s not about perfection; it’s about the pulse of the moment, the smell of melted cheese mingling with boiling pasta, and that satisfying, slightly sticky bite. That’s what keeps me coming back to this recipe, especially when I need a little chaos and a lot of comfort.
- heading: Kitchen Chaos Meets Comfort
Contextual origin, trivia, or history
- This dish is a gritty, no-frills version inspired by the high-stakes chaos of Hell’s Kitchen, where perfection is often sacrificed for speed and flavor.
- Historically, mac and cheese originated in 18th-century Europe, but this version nods to American comfort food with a bold, aggressive twist—think sharp cheeses and a smoky finish.
- The name ‘Hell’s Kitchen’ here isn’t just a stylistic choice; it’s a tribute to the intense, unpredictable energy that fuels both the show and this dish’s creation.
Ingredient breakdown: key components
- Cheddar cheese: I love a sharp, aged cheddar that melts into gooey richness—look for one with a bit of a crumbly texture, it adds depth. Swap for Monterey Jack if you want milder, but don’t skip that punch of flavor.
- Elbow macaroni: Classic for a reason, I prefer it slightly undercooked—still firm, but with a bit of bite. Whole wheat adds nuttiness if you’re feeling healthy, but it changes the texture a bit.
- Milk and heavy cream: The combo makes the sauce lush and velvety. Use whole milk for creaminess, or swap half-and-half for a lighter version—just don’t go skim, or it’ll be thin and flat.
- Butter: It’s the base for that rich, toasty flavor. Use unsalted, and if you’re feeling extra, toss in a little smoked paprika for a subtle smoky edge—trust me, it’s a game changer.
- Mustard powder: A pinch of this wakes up the cheese. If you don’t have it, a dash of Dijon can work, but keep it subtle—too much and it’s overpowering, not bright.
- Breadcrumbs: I like them toasted with butter and a sprinkle of paprika on top for that crunchy crown. Skip if you want a softer, more casserole-style finish, but it’s not the same.
- Hot sauce or cayenne: A couple dashes add a spicy kick that cuts through the richness. Use sparingly at first—you can always add more, but you can’t take it out.
Spotlight on key ingredients
Cheddar cheese:
- I love a sharp, aged cheddar that melts into gooey richness—look for one with a bit of a crumbly texture, it adds depth. Swap for Monterey Jack if you want milder, but don’t skip that punch of flavor.
- Elbow macaroni: Classic for a reason, I prefer it slightly undercooked—still firm, but with a bit of bite. Whole wheat adds nuttiness if you’re feeling healthy, but it changes the texture a bit.
Milk, heavy cream & breadcrumbs:
- Milk and heavy cream: The combo makes the sauce lush and velvety. Use whole milk for creaminess, or swap half-and-half for a lighter version—just don’t go skim, or it’ll be thin and flat.
- Breadcrumbs: I like them toasted with butter and a sprinkle of paprika on top for that crunchy crown. Skip if you want a softer, more casserole-style finish, but it’s not the same.
Notes for ingredient swaps
- Dairy-Free: Use a plant-based cheese and almond or oat milk. It won’t be as rich, but it’ll still satisfy that cheesy craving.
- Gluten-Free: Swap traditional elbow macaroni for a gluten-free pasta like chickpea or rice-based shapes. Keep an eye on cooking times, they cook faster or slower depending on the brand.
- Cheese Variations: Switch sharp cheddar for smoked Gouda or pepper jack for a different flavor punch. They melt well and add a unique twist.
- Cream Alternatives: Heavy cream can be replaced with coconut cream for a richer, slightly coconut-y flavor. Use sparingly so it doesn’t overpower the cheese.
- Spicy Kick: Add a dash of hot sauce or a pinch of cayenne to the cheese sauce for extra heat. Adjust according to your spice tolerance.
- Breadcrumb Topping: Use crushed Ritz or buttery croutons instead of traditional breadcrumbs for a different crunch and flavor.
- Butter Swap: Olive oil or vegan butter can replace regular butter, but the flavor will be slightly different—less toasty, more fruity.
Equipment & Tools
- Large pot: Boil pasta efficiently in salted water.
- Saucepan: Prepare and simmer the cheese sauce.
- Whisk: Prevent lumps and incorporate ingredients smoothly.
- Baking dish: Finish in the oven for a crispy topping.
Step-by-step guide to Hell’s Kitchen Mac and Cheese
- Gather your equipment: a large pot for boiling, a saucepan for the cheese sauce, a whisk, and a baking dish if finishing in the oven. Preheat your oven to 200°C (390°F) if baking.
- Bring a large pot of salted water to a boil. Add the elbow macaroni and cook for 2 minutes less than package directions—aim for a firm bite. Drain and set aside.
- In the saucepan, melt 4 tbsp of butter over medium heat (about 160°C/320°F). Once melted, whisk in 2 tbsp of flour. Cook, whisking constantly, until the mixture turns light golden, about 1 minute.
- Slowly pour in 2 cups of milk and 1 cup of heavy cream, whisking to prevent lumps. Bring to a simmer, about 3-4 minutes, until the sauce thickens slightly and coats the back of a spoon.
- Lower the heat and stir in 2 cups of shredded sharp cheddar cheese, 1 tsp of mustard powder, and a pinch of cayenne. Keep stirring until the cheese melts and the sauce becomes smooth and oozy.
- Add the cooked pasta to the cheese sauce. Stir well until evenly coated. Taste and adjust seasoning with salt or hot sauce if needed.
- Transfer the mixture to a greased baking dish if you want a crispy top. For a baked finish, sprinkle with toasted breadcrumbs and a drizzle of melted butter.
- Bake uncovered for 15-20 minutes, until bubbling around the edges and the top is golden brown. If skipping the oven, serve straight from the stovetop, hot and gooey.
- Let sit for 5 minutes before serving. Resting allows the sauce to thicken slightly and makes plating easier. Garnish with extra cheese or hot sauce if desired.
Allow the mac and cheese to rest 5 minutes before serving. This helps the sauce set up and makes serving easier. Finish with a sprinkle of extra cheese or hot sauce for added flavor and visual appeal.
How to Know It’s Done
- Cheese sauce is smooth, bubbly, and coats the back of a spoon.
- Pasta is firm but not raw, with a slight bite.
- Top is golden and crispy if baked, bubbling if stovetop served.
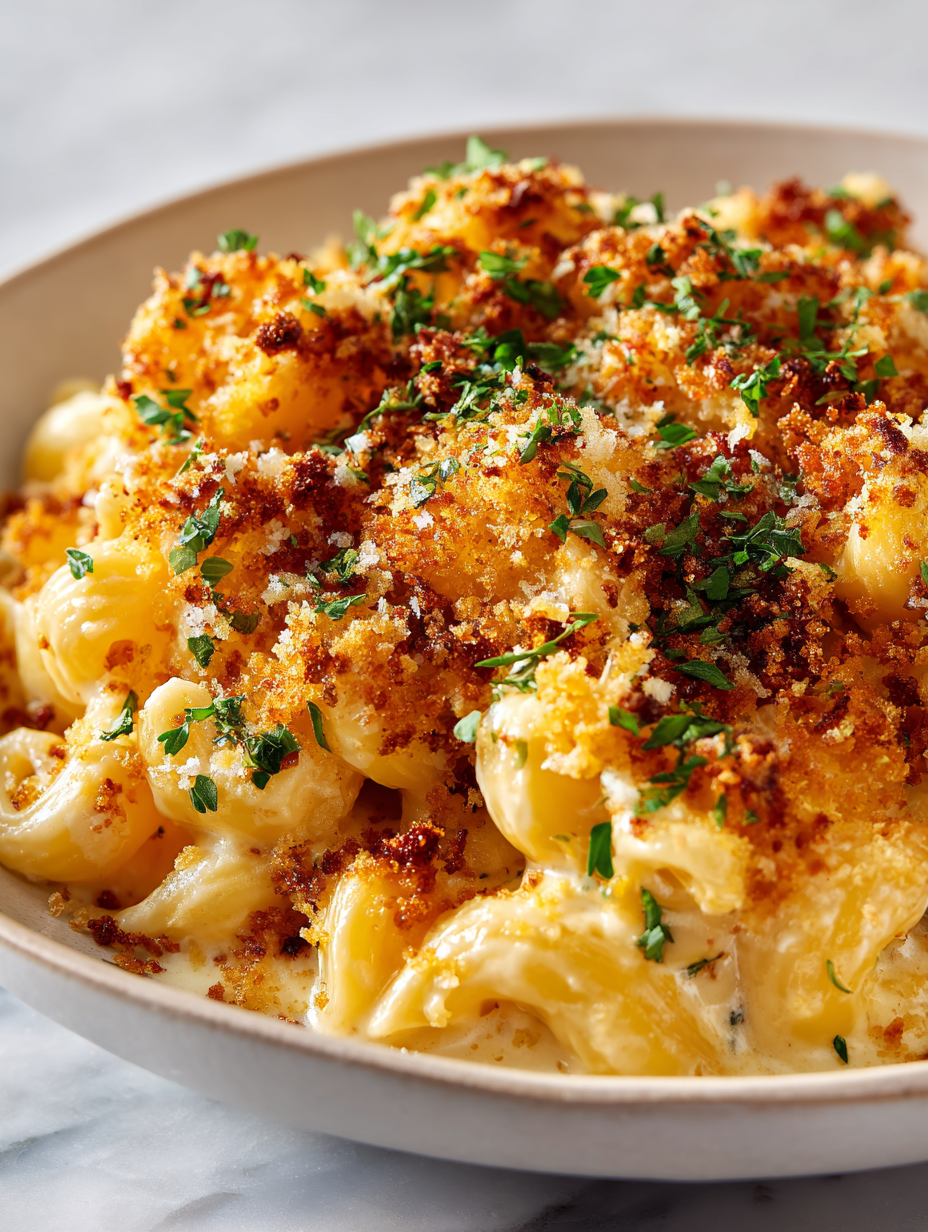
Hell’s Kitchen Mac and Cheese
Ingredients
Equipment
Method
- Bring a large pot of salted water to a boil, then add the elbow macaroni and cook until just under al dente, about 2 minutes less than package instructions. Drain and set aside.
- In a saucepan, melt the butter over medium heat until it starts to sizzle and smell toasty. Add the flour and whisk continuously for about 1 minute until the mixture turns light golden.
- Slowly pour in the milk and heavy cream, whisking constantly to prevent lumps. Bring the mixture to a gentle simmer, and cook for 3-4 minutes until it thickens slightly and coats the back of a spoon.
- Lower the heat and stir in the shredded cheddar cheese, mustard powder, and cayenne pepper. Keep stirring until the cheese has melted into a smooth, cheesy sauce with a bubbling, gooey texture.
- Add the cooked pasta directly into the cheese sauce and stir well to coat every piece. The sauce should be thick, cheesy, and slightly sticky—adjust seasoning with hot sauce if you like extra heat.
- Transfer the cheesy pasta mixture into a greased baking dish. Spread evenly and sprinkle the toasted breadcrumbs over the top for a crunchy crown.
- Dot the top with a few small knobs of butter for extra richness, then bake in a preheated oven at 200°C (390°F) for 15-20 minutes until bubbling and golden brown on top.
- Remove from the oven and let rest for about 5 minutes—this helps the cheese sauce to set slightly and makes serving easier.
- Slice and serve hot, with a sprinkle of extra cheese or hot sauce if desired. The dish should be gooey, cheesy, with a crispy topping, and full of bold, chaotic flavors.
Pro tips for perfect mac and cheese
- Use freshly grated cheese for maximum meltiness and flavor. Pre-grated cheese often contains anti-caking agents that prevent smooth melting.
- Salt your pasta water generously—salty water flavors the pasta from within, making all the difference in the final dish.
- When making the roux, cook the flour until it’s just golden—this develops flavor and prevents a raw, starchy taste in your sauce.
- Add cheese gradually off the heat. This prevents clumping and ensures a silky, smooth sauce that coats every piece of pasta.
- For a crispy topping, toast breadcrumbs in butter until golden and fragrant. Watch closely to avoid burning and add a smoky aroma.
- Don’t forget to taste and adjust seasoning after baking. The cheese can mellow, so a pinch more salt or hot sauce might be needed.
- Rest the mac and cheese for 5 minutes before serving—this helps the sauce thicken up and makes it easier to plate without losing gooeyness.
Common mistakes and how to fix them
- FORGOT to adjust heat; if sauce splits, whisk in a splash of cold milk to bring it back together.
- DUMPED cheese too quickly; add cheese gradually off heat to avoid clumps and achieve smoothness.
- OVER-TORCHED breadcrumb topping; toast breadcrumbs on low heat, stirring constantly for even, golden color.
- MISSED salt at the end; taste and season after baking or stovetop to enhance cheesy flavor.
Quick fixes and pantry swaps
- When sauce splits, splash cold milk and whisk vigorously to rescue smoothness.
- Dumped cheese too quickly? Add it gradually off heat to avoid clumping.
- Over-torched breadcrumbs? Lower heat and toast slowly for even golden color.
- Forgot to season? Taste and adjust salt or hot sauce after baking for full flavor.
- Splash extra milk if reheating leftovers to loosen thickened cheese sauce.
Prep, store, and reheat tips
- You can prep the cheese sauce and cook the pasta a day in advance. Keep them separate in airtight containers in the fridge; the sauce will thicken slightly and the pasta may cling a bit, but reheats well with a splash of milk.
- Assemble the dish ahead of time, but don’t bake until you’re ready to serve. Cover tightly with plastic wrap and refrigerate for up to 24 hours. The flavors meld and the cheese develops a richer tang overnight.
- Reheat gently over low heat on the stovetop, stirring frequently. Add a touch more milk or cream to loosen the sauce. Expect the texture to be slightly softer but still creamy if reheated carefully.
- Leftovers will keep in the fridge for 2-3 days. The cheese might firm up or become a little grainy, but a gentle reheat with stirring will bring back some of its gooey charm.
- For freezing, cool the assembled but unbaked dish completely. Wrap tightly in foil or transfer to a freezer-safe container. It will keep for up to 2 months. Thaw overnight in the fridge and reheat as above, watching for bubbling edges and that cheesy shimmer.
Top questions about Hell’s Kitchen Mac and Cheese
1. Can I use pre-shredded cheese?
Yes, using pre-shredded cheese can lead to clumping because of anti-caking agents. It’s best to grate your own for a smooth melt.
2. Can I prepare this dish in advance?
Absolutely. You can bake it ahead, then reheat in the oven or microwave. Expect a softer texture, but it still tastes great.
3. How can I make it spicier?
Yes, adding a splash of hot sauce or a pinch of cayenne can turn up the heat and flavor. Adjust to taste.
4. Can I make it gluten-free?
Using gluten-free pasta works well, but cook it slightly less to prevent mushiness. The sauce remains rich and cheesy.
5. Should I season after baking?
Adjust the seasoning after baking. Sometimes the cheese mellows out, so a little extra salt or spice enhances the flavor.
6. What if the cheese sauce separates?
If the sauce splits, whisk in a splash of cold milk to bring it back together smoothly.
7. How can I enhance the flavor?
Using smoked paprika or adding a pinch of mustard powder boosts flavor complexity and depth in the sauce.
8. How do I get a crispy topping?
For extra crunch, sprinkle toasted breadcrumbs on top just before serving. It adds a satisfying texture contrast.
9. Can I make it dairy-free?
Yes, you can swap heavy cream for coconut cream for a dairy-free version, but it gives a subtle coconut aroma.
10. When should I season the dish?
Taste and adjust the salt and spice levels after baking, as flavors can mellow during reheating or resting.
This dish isn’t about polish or perfection, it’s about embracing the chaos—cheesy, bubbling, and a little wild. It’s the kind of recipe that feels just right after a long day, when comfort and edge collide in that perfect, messy way.
In the end, it’s the raw, unpolished moments that make this mac and cheese special. It’s honest, a little chaotic, but always satisfying—just like a busy kitchen’s heartbeat, loud and full of life.

Hi, I’m Emma Collins, the recipe developer and writer behind Sailing With Seasons. I’m so happy you’ve found your way here. This blog is my celebration of seasonal ingredients, simple cooking, and the quiet joy that comes from preparing food with intention. Sailing With Seasons is where I share the recipes, lessons, and kitchen rituals that have shaped my life. It is a space built on curiosity, care, and a deep respect for real ingredients.


Leave a Reply