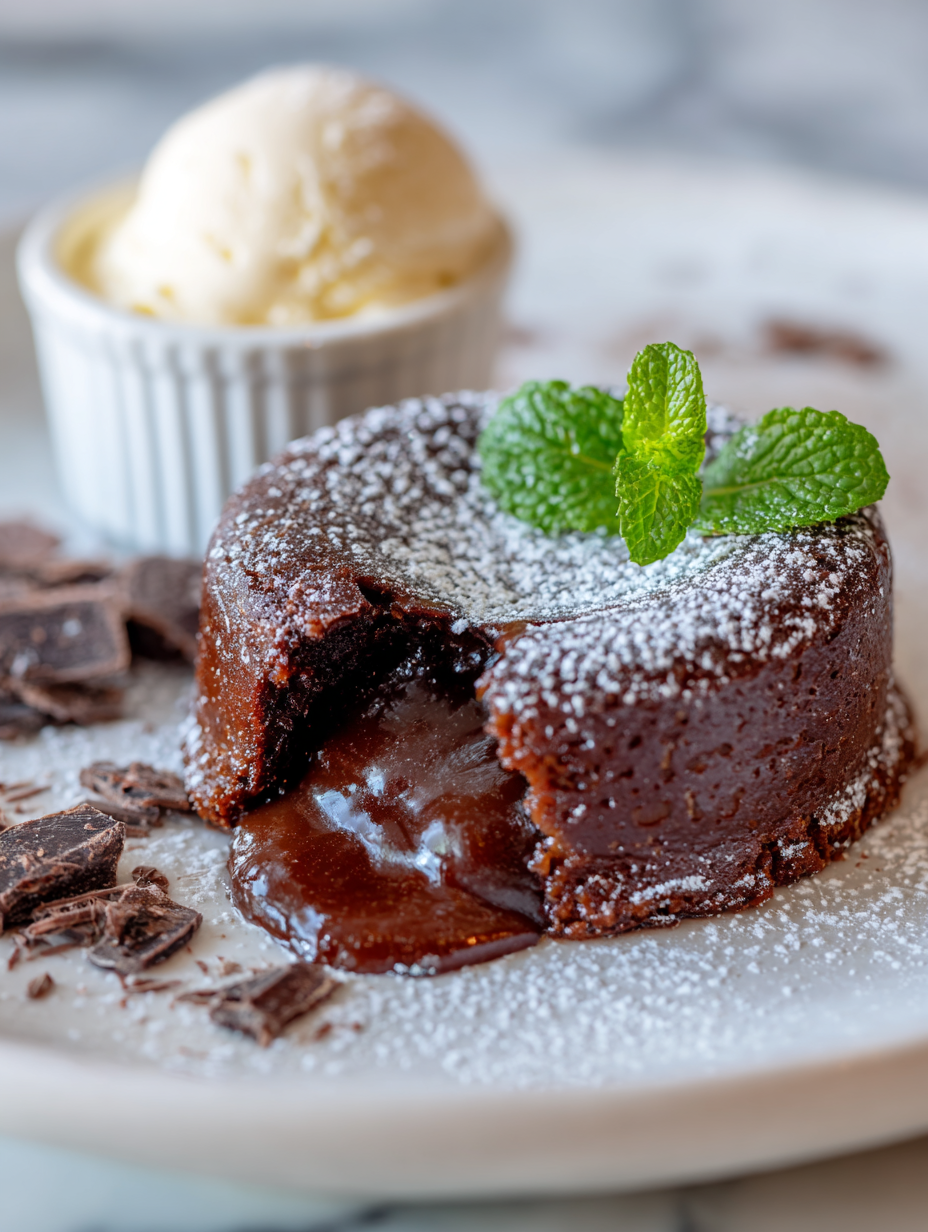
Focusing on the secret technique of achieving the perfect molten center, I see each fondant as a tiny, edible science experiment. The thrill is in the moment you crack the crisp exterior and that rich, velvety chocolate gushes out, making it feel like a personal victory each time. It’s a dish that demands patience but rewards with a deeply satisfying, almost theatrical reveal, perfect for impressing without fuss.
This recipe is more than just a dessert; it’s a test of timing and technique that transforms simple ingredients into something truly memorable. Every step, from melting the chocolate to the final bake, is about controlling the heat and timing just right. When it works, that molten center is a burst of warm, bittersweet chocolate that feels like a secret shared between you and whoever’s lucky enough to taste it.
Focusing on the secret technique of achieving the perfect molten center, I see each fondant as a tiny, edible science experiment. The thrill is in the moment you crack the crisp exterior and that rich, velvety chocolate gushes out, making it feel like a personal victory each time. It’s a dish that demands patience but rewards with a deeply satisfying, almost theatrical reveal, perfect for impressing without fuss.
Science and art in molten chocolate
- That first crack when the chocolate oozes out feels like uncovering a secret treasure.
- There’s a quiet pride in mastering this delicate balance of timing and temperature.
- Nothing beats the warm, gooey center melting in my mouth after a long day.
- I get a little thrill every time I see that perfect rise and glossy finish.
- Sharing a fondant that’s just right always feels like a small, sweet victory.
The story behind this recipe
- This recipe came about after a night spent trying to perfect that elusive molten center. I remember standing in my kitchen, melting dark chocolate and imagining how a tiny, warm burst could turn a simple dessert into something unforgettable. It’s funny how a little bit of science and a lot of patience can create such a moment of magic.
- I first served these at a dinner party, and watching my friends crack the surface and watch that rich chocolate flow out felt like I’d unlocked a secret. Since then, every time I make them, I’m reminded that sometimes, the smallest details—like timing and temperature—make the biggest difference. It’s a dish that’s as much about the process as the end result.
- heading
- The story behind this recipe
Chocolate Fondant Trivia
- Chocolate fondant, also known as molten lava cake, was popularized in the 1980s by French pastry chefs experimenting with contrasting textures.
- The dish’s name in French, ‘fondant,’ refers to its soft, melting interior that contrasts with a firmer exterior.
- Some claim the first modern recipe appeared in a Parisian bakery where a baker accidentally left the center too runny, creating this beloved dessert.
- The combination of rich chocolate and a warm, gooey center taps into a primal love for contrasting textures—crisp shell, velvety core.
- In the UK, chocolate fondant became a staple at dinner parties, especially during the 1990s, celebrated for its simple elegance and impressive reveal.
Key ingredients for chocolate fondant
- Dark chocolate: I use 70% cocoa for that deep, slightly bitter richness that balances the sweetness. Swap with milk chocolate for a milder, creamier taste, but be ready for a softer center.
- Butter: I melt unsalted butter until it’s silky, which helps create that glossy, smooth fondant. If you only have margarine, it’s fine, but the texture might be a tad less luscious.
- Eggs: I prefer large eggs at room temp—they give structure and a tender crumb. For a lighter version, try swapping in a bit of yogurt, but keep the eggs if you want that classic gooey core.
- Sugar: I use superfine caster sugar for quick dissolving and a fine crumb. Brown sugar adds a caramel note if you’re feeling rich, but it’ll darken the final color.
- Flour: Just a touch of plain flour, sifted well, keeps the texture tender but not cakey. Almond flour can add a nutty depth if you want a twist.
- Cocoa powder: I sift in a bit of unsweetened cocoa for that intense chocolate aroma. Dutch-processed cocoa makes it richer, but natural cocoa works just as well for a slightly brighter flavor.
- Salt: A pinch of sea salt enhances all those chocolate flavors and keeps the sweetness in check. Skip it if you prefer a pure, unbalanced chocolate experience.
Spotlight on key ingredients
Chocolate:
- Dark chocolate: I prefer 70% cocoa for that deep, slightly bitter richness. It melts smoothly and provides a velvety, intense flavor that’s essential for that gooey center.
- Butter: I use unsalted butter, melted until glossy. It gives the fondant its rich, tender crumb and glossy finish. If you substitute margarine, expect a slightly less luscious texture.
Eggs and Sugar:
- Eggs: I whisk large eggs at room temperature until frothy. They give structure and help create that tender crumb, plus that iconic molten texture when baked just right.
- Sugar: I use superfine caster sugar for quick dissolving and a fine crumb. It balances the bitterness of the chocolate and contributes to that shiny, crackly top.
Notes for ingredient swaps
- Dairy-Free: Swap butter for coconut oil or a neutral vegetable oil. It won’t be quite as rich, but it keeps the texture moist and tender.
- Vegan Chocolate: Use a good-quality dairy-free dark chocolate and a plant-based butter substitute. Expect a slightly less glossy finish but still deliciously gooey.
- Sweetener: Replace superfine sugar with honey, maple syrup, or agave. These add moisture and a hint of floral or caramel notes.
- Flour: Almond flour or gluten-free baking mix as a 1:1 substitute. They add a nutty flavor and can alter the crumb slightly.
- Cocoa Powder: Dutch-processed cocoa gives a richer, smoother flavor, but natural cocoa powder will brighten the chocolate taste and color.
- Eggs: Flaxseed meal or applesauce can work as a binder substitute. Expect a slightly denser, less structured fondant.
- Chocolate Type: Milk chocolate for a sweeter, creamier core; white chocolate for a lighter, sweeter variation. Adjust baking time accordingly.
Equipment & Tools
- Ramekins: To shape and bake individual fondants evenly.
- Heatproof bowl: To melt chocolate and butter gently over simmering water.
- Whisk: To mix eggs and sugar until light and frothy.
- Sieve: To sift flour and cocoa powder for a smooth batter.
- Baking tray: To hold ramekins during baking, ensuring even heat.
- Spatula: To fold ingredients gently and smooth the tops.
Step-by-step guide to chocolate fondant
- Preheat your oven to 200°C (390°F). Grease 4 ramekins lightly with butter and dust with cocoa powder, tapping out excess.
- Chop 200g dark chocolate into small pieces. Melt it with 100g butter in a heatproof bowl over a simmering water bath, stirring until smooth. Let cool slightly.
- In a separate bowl, whisk 3 large eggs, 100g superfine sugar, and a pinch of salt until well combined and slightly frothy—about 1 minute.
- Pour the slightly cooled chocolate mixture into the egg mixture, gently folding to combine. Be careful not to deflate the mixture.
- Sift 50g all-purpose flour and 10g unsweetened cocoa powder into the wet ingredients. Fold gently until just combined. Do not overmix.
- Divide the batter evenly between the prepared ramekins. Smooth the tops with a spatula and run a finger around the edges to prevent sticking.
- Place ramekins on a baking tray and bake for 10-12 minutes. The edges should be set, but the center still slightly jiggly when gently shaken.
- Remove from oven. Let rest for 1-2 minutes before carefully inverting each ramekin onto a plate. Gently tap and lift to release.
- Serve immediately for the best molten core. Optional: dust with cocoa powder or powdered sugar, and add a dollop of whipped cream or berries.
Let the fondants rest for 1-2 minutes after baking, then invert onto plates carefully. Serve immediately with optional toppings for maximum gooeyness.
How to Know It’s Done
- The edges are firm but the center still jiggles slightly when shaken.
- The top has a slight crack and a glossy, crackly surface.
- When pressed gently, the center yields with a soft, velvety feel.
Chocolate Fondant
Ingredients
Equipment
Method
- Preheat your oven to 200°C (390°F). Lightly butter four ramekins and dust them with cocoa powder, tapping out the excess.
- Chop the dark chocolate into small pieces and melt it together with the butter in a heatproof bowl set over simmering water. Stir until smooth and glossy, then set aside to cool slightly.
- In a separate bowl, whisk the eggs, sugar, and a pinch of salt until the mixture is frothy and slightly increased in volume, about 1 minute.
- Pour the cooled chocolate mixture into the egg mixture and gently fold together with a spatula until fully combined, maintaining a smooth, shiny batter.
- Sift the flour and cocoa powder into the batter and fold gently until just incorporated, being careful not to deflate the mixture.
- Divide the batter evenly among the prepared ramekins, smoothing the tops with a spatula and running a finger around the edges to prevent sticking.
- Place the ramekins on a baking tray and bake in the preheated oven for 10-12 minutes. The edges should be set, but the center still jiggly when gently shaken.
- Remove the ramekins from the oven and let them rest for 1-2 minutes. Carefully invert each onto a serving plate and gently tap to release.
- Serve immediately while the molten center is flowing, optionally dusted with cocoa powder or powdered sugar, and with your favorite accompaniments like berries or whipped cream.
Tips & tricks for perfect fondant
- Bolded tip: Chill your batter slightly before baking to help control the rise and prevent over-expansion.
- Bolded tip: Use room temperature eggs for better incorporation and a smoother batter, which ensures a more uniform molten center.
- Bolded tip: Tap the ramekins on the counter once baked to release excess air and achieve a cleaner, professional look.
- Bolded tip: Bake one minute less for a more liquid center, or add an extra minute if the fondant is too runny for your liking.
- Bolded tip: Cracks on the surface? Gently run a knife around the edge before inverting—this helps release it smoothly and keeps the shape tidy.
- Bolded tip: For an extra glossy finish, brush the surface with a warm, slightly melted chocolate or a sugar glaze just after baking.
- Bolded tip: Serve immediately after inverting for that perfect, gooey molten core—resisting the urge to wait makes all the difference.
Common mistakes and how to fix them
- FORGOT to check oven temperature → Use an oven thermometer for accuracy.
- DUMPED batter into hot oven → Ensure oven is fully preheated before baking.
- OVER-TORCHED the fondant → Bake for exactly 10-12 minutes; edges should be firm but centers jiggly.
- UNDER-BAKED the center → Bake a little longer if the middle is still runny after 12 minutes.
Quick fixes and pantry swaps
- When batter is too thick → Splash in a little warm water to loosen it.
- If fondants crack during baking → Patch with warm melted chocolate immediately.
- Overbaked and center is firm → Shield with a drizzle of warm chocolate sauce.
- Dumped batter into hot oven → Always preheat thoroughly before baking.
- When fondant is flat or deflates → Rescue with a quick blast of heat in the microwave for 5 seconds.
Prep, store, and reheat tips
- You can prepare the batter a day in advance; keep it covered in the fridge. The flavors meld together, and it firms up slightly, making it easier to portion and bake.
- Unbaked fondants can be stored in the fridge for up to 24 hours. Cover tightly to prevent drying out and absorb fridge odors. Bring to room temperature before baking for even heat distribution.
- Baked fondants are best enjoyed fresh but can be stored in an airtight container at room temperature for up to 2 hours. Reheat gently in a 180°C (350°F) oven for 3-5 minutes until the center is warm and gooey again.
- Refrigerated or frozen fondants will lose some of their molten magic if reheated improperly. For best results, warm them slowly and watch for the center to just soften without drying out.
- The rich chocolate aroma intensifies after resting overnight in the fridge, but the texture becomes firmer. Reheat with care to revive the gooey core—use a gentle, low-temperature oven or microwave in short bursts.
Top questions about chocolate fondant
1. How do I get a molten center in my fondant?
A molten center is achieved by baking just enough for the edges to set while keeping the middle soft and runny. Timing is key—usually around 10-12 minutes in a hot oven.
2. Which chocolate is best for chocolate fondant?
Use high-quality dark chocolate with at least 70% cocoa content for that rich, velvety flow. Cheaper chocolates can seize or be too sweet, ruining the texture.
3. How do I know when my fondant is done?
Preheat your oven thoroughly and bake on the middle rack. Check at 10 minutes; a slight jiggle in the center indicates it’s perfect.
4. How do I prevent sticking?
Greasing and dusting ramekins with cocoa powder helps release the fondant smoothly. Run a knife around the edge before inverting for a clean presentation.
5. Can I make it ahead of time?
Serve immediately after inverting. The molten center begins to cool and firm up quickly, so timing is everything for that perfect gooey flow.
6. Can I prepare chocolate fondant ahead?
Yes, you can prepare the batter a day in advance, keep it in the fridge, and bake directly from cold. Adjust baking time slightly if needed.
7. What if my fondant is too firm inside?
If the fondant is overbaked and the center isn’t molten, bake for another minute or two next time, or lower the oven temperature slightly.
8. How do I fix cracks or surface imperfections?
If cracks appear on the surface, gently smooth them with a warm knife or brush with warm chocolate for a polished look.
9. Any tips for perfect texture and shine?
Use room temperature eggs, precise timing, and avoid overmixing to keep the batter light and ensure a smooth, shiny top after baking.
10. How do I reheat leftovers without ruining them?
When reheating, do so gently in a low-temp oven or microwave in short bursts. The goal is to warm the center without drying it out.
There’s a quiet thrill in cracking open a warm, molten chocolate fondant. That burst of velvety richness and the contrast of crispy shell and gooey center feels like a small, personal celebration.
Making these isn’t just about the dessert; it’s about trusting the process, paying attention to tiny details, and enjoying the imperfect art of baking. Sometimes, the best moments happen when things don’t go perfectly—and you find a way to make it still taste incredible.

Hi, I’m Emma Collins, the recipe developer and writer behind Sailing With Seasons. I’m so happy you’ve found your way here. This blog is my celebration of seasonal ingredients, simple cooking, and the quiet joy that comes from preparing food with intention. Sailing With Seasons is where I share the recipes, lessons, and kitchen rituals that have shaped my life. It is a space built on curiosity, care, and a deep respect for real ingredients.


Leave a Reply