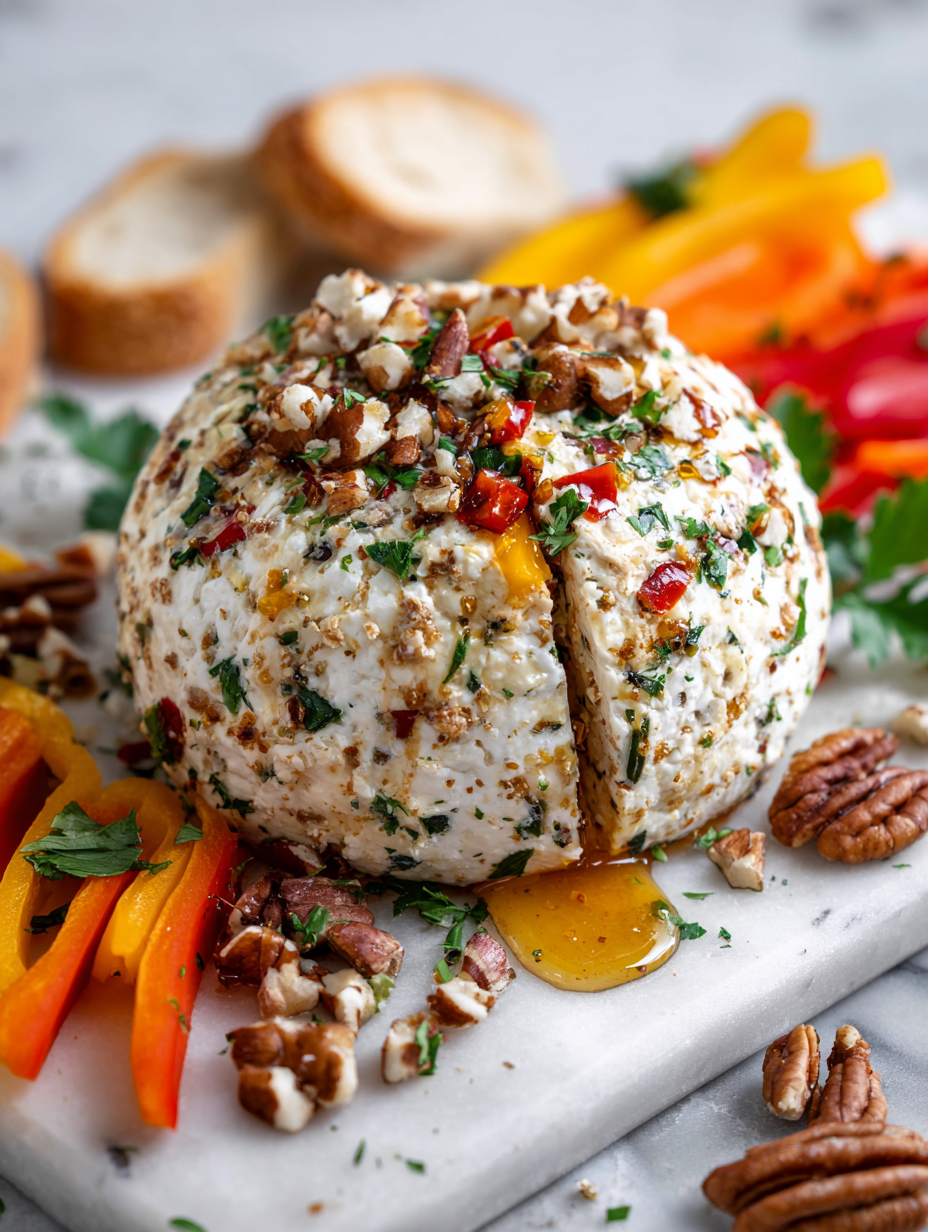
A cheese ball might seem like a simple appetizer, but for me, it’s a vessel of messy, joyful gatherings. It’s the kind of dish that makes you forget about perfection—just grab a spoon or a cracker and dive in. There’s a nostalgic charm in its gooey, crumb-coated exterior that sparks spontaneous smiles around the table.
I remember the first time I made one for a last-minute party. The whole process was chaotic—cheese melting, herbs spilling, hands getting sticky—but every bite felt like a warm hug from an old friend. It’s imperfect, it’s unpolished, but it’s exactly that authenticity that makes it special.
This cheese ball isn’t about fancy ingredients or presentation. It’s about the raw, unpretentious joy of sharing something homemade, even if it’s a little rough around the edges. It’s the kind of dish that turns a simple get-together into a moment everyone will talk about—messy, cheesy, and perfectly imperfect.
Focusing on how a cheese ball can be a nostalgic centerpiece that sparks spontaneous gatherings, emphasizing its role in imperfect, joyful moments around the table.
A Nostalgic Party Staple
- Making this cheese ball always brings back chaotic holiday kitchens filled with laughter and spilled cheese.
- There’s a strange pride in shaping the perfect round—only to have it crack and crumble when you serve it.
- I love how a simple mix of ingredients can turn into something so gooey and irresistible, it disappears in minutes.
- This dish feels like a warm hug from childhood, messy and unpolished but packed with flavor and memories.
- Nothing beats the joy of watching guests dig into it, cheeks smeared with cheese, smiles wide with nostalgia.
A Nostalgic Party Staple
Making this cheese ball always takes me back to childhood holiday gatherings. My family would gather around the kitchen counter, trying to shape the perfect sphere, only for it to crack or get messy—just like life. Those moments of chaos, laughter, and sticky fingers remind me that the best food doesn’t have to be perfect to be memorable. Now, I find joy in crafting it for friends, knowing it’s the imperfect, gooey center of good times.
Contextual origin, trivia, or history
- Cheese balls gained popularity in the mid-20th century as a casual appetizer for parties and potlucks.
- Originally, cheese balls were made with simple ingredients like cream cheese and shredded cheese, often coated with nuts or herbs.
- The dish’s American rise coincided with the rise of snack-centric social gatherings in the 1950s and 60s.
- Some believe the cheese ball’s playful shape and coating made it a fun, approachable appetizer for all ages.
- Quirky variations exist worldwide, with some versions incorporating local cheeses, spices, or even sweet coatings.
Ingredient breakdown: key components
- Cream cheese: I love how it melts into a smooth, tangy base—swap with mascarpone for a milder, creamier touch.
- Shredded cheddar: Adds sharpness and a little bite—try pepper jack if you want a spicy kick that melts beautifully.
- Herbs (parsley, chives): Fresh herbs brighten the mix and add color—dried herbs work if fresh aren’t available, but they’re less vibrant.
- Nuts (pecans, walnuts): Coating with chopped nuts gives crunch and richness—toast them first for a deeper, smoky aroma.
- Worcestershire or hot sauce: A splash adds depth and a subtle tang—omit if you prefer a milder flavor, but it’s a game-changer.
- Seasonings (salt, pepper): I keep it simple, but a pinch of smoked paprika can add a lovely smoky undertone—use sparingly.
- Optional mix-ins (bacon bits, olives): For extra flavor, fold in crispy bacon or chopped olives—think of it as adding a personal twist.
Spotlight on key ingredients
Cream cheese:
- I love how it melts into a smooth, tangy base—swap with mascarpone for a milder, creamier touch.
- Shredded cheddar: Adds sharpness and a little bite—try pepper jack if you want a spicy kick that melts beautifully.
Herbs and Nuts:
- Nuts (pecans, walnuts): Coating with chopped nuts gives crunch and richness—toast them first for a deeper, smoky aroma.
- Herbs (parsley, chives): Fresh herbs brighten the mix and add color—dried herbs work if fresh aren’t available, but they’re less vibrant.
Notes for ingredient swaps
- Dairy-Free: Swap cream cheese with a blend of blended silken tofu and nutritional yeast for creaminess, though it’ll lack the tang and richness of dairy.
- Vegan Cheese: Use a store-bought vegan cheese block or homemade nut-based cheese, which melts less but still offers flavor and texture.
- Cheddar Alternatives: Substitute with Monterey Jack or Pepper Jack for a milder or spicier profile, or try a smoked cheese for depth.
- Herb Variations: Fresh basil or cilantro can replace parsley and chives, adding different brightness or earthiness, but they’ll change the flavor profile.
- Nuts: Almonds or cashews can replace walnuts or pecans, providing crunch with a different flavor and oil content. Toast nuts first for richer aroma.
- Hot Sauce/Worcestershire: Use a dash of soy sauce or tamari for umami, or omit entirely if you want a milder, less tangy taste.
- Seasonings: Smoked paprika or cayenne can stand in for hot sauce, giving a smoky or spicy kick without the extra liquid.
Equipment & Tools
- Mixing bowl: To blend all ingredients smoothly.
- Spatula: To mix ingredients thoroughly.
- Knife and chopping board: To chop herbs and nuts.
- Skillet: To toast nuts for extra flavor.
- Plastic wrap: To wrap and chill the cheese ball.
- Serving platter: To present the finished cheese ball.
Step-by-step guide to cheese ball
- Gather all ingredients: cream cheese, shredded cheese, herbs, nuts, and seasonings. Let them sit at room temperature for about 15 minutes to soften, making mixing easier.
- In a large mixing bowl, combine 8 oz of softened cream cheese and 1 cup shredded cheddar cheese. Mix thoroughly until smooth and well incorporated, about 2 minutes with a spatula.
- Add 2 tablespoons chopped fresh herbs—parsley and chives—to the cheese mixture. Stir until evenly distributed, adjusting with more herbs if desired for color and flavor.
- Season with a pinch of salt, black pepper, and a dash of hot sauce or Worcestershire for depth. Mix again, tasting as you go to balance flavors.
- Scoop out the cheese mixture and shape it into a rough ball with your hands. Don’t worry if it’s a bit uneven; it will firm up later.
- Spread ½ cup chopped nuts on a plate. Roll the cheese ball in the nuts, pressing gently to coat evenly. For extra crunch, toast the nuts in a dry skillet over medium heat until fragrant and golden—about 3 minutes.
- Wrap the cheese ball loosely in plastic wrap and refrigerate for at least 1 hour, or up to 24 hours. This helps it firm up and the flavors meld.
- Before serving, remove from fridge and let sit at room temp for 15 minutes to soften slightly. Garnish with additional herbs if desired.
- To serve, place on a platter with crackers, sliced baguette, or fresh veggie sticks. Let guests scoop or spread as they like.
Wrap the cheese ball in plastic wrap and refrigerate for at least 1 hour to allow flavors to meld and texture to firm up. Before serving, let it sit at room temperature for 15 minutes for easier spreading and a softer bite. Garnish with extra herbs or nuts for presentation.
How to Know It’s Done
- Cheese mixture is smooth and evenly mixed before shaping.
- Nuts are toasted and coated evenly, with a fragrant, nutty aroma.
- Cheese ball feels firm but slightly soft when pressed gently, indicating proper chilling.
Messy Cheese Ball
Ingredients
Equipment
Method
- Gather your softened cream cheese and shredded cheese in a large bowl, and mix them together thoroughly until smooth and creamy, with no lumps.
- Add the chopped fresh herbs to the cheese mixture and stir until evenly distributed, giving it a vibrant, colorful look.
- Season the mixture with a splash of hot sauce or Worcestershire, plus a pinch of salt and pepper, then stir again to incorporate all the flavors.
- Scoop out the cheese mixture and shape it into a rustic ball using your hands. Don’t worry if it’s a little uneven—its charm is part of the fun.
- Spread the chopped nuts on a plate, then gently roll the cheese ball in the nuts, pressing slightly to help them adhere evenly. Toast the nuts beforehand for extra flavor and crunch.
- Wrap the coated cheese ball loosely in plastic wrap, then refrigerate for at least 1 hour to let it firm up and the flavors meld.
- Once chilled, remove the cheese ball from the fridge and let it sit at room temperature for 15 minutes—this softens it slightly and makes it easier to serve.
- Place the cheese ball on a platter and surround it with crackers, sliced baguette, or veggie sticks for dipping. Garnish with extra herbs or nuts if desired.
Notes
Pro tips for cheese ball perfection
- Bold coating: Use toasted nuts to add a rich, smoky crunch—toast them until fragrant and golden, about 3 minutes over medium heat.
- Chill thoroughly: Let the cheese ball rest in the fridge for at least an hour; it firms up and flavors meld beautifully.
- Room temp ingredients: Soften cream cheese and shredded cheese at room temperature for easier mixing and a smoother texture.
- Gently shape: When forming the ball, handle it softly to prevent cracks; a slightly uneven shape adds charm, not flaw.
- Taste as you go: Adjust seasonings gradually—be it herbs, hot sauce, or salt—to hit the perfect flavor balance.
- Nut coating: For extra flavor, toast nuts first—this intensifies aroma and enhances crunch when coating the cheese ball.
- Serve at ideal moment: Take out of the fridge about 15 minutes before serving; it softens slightly for optimal spreading.
Common mistakes and how to fix them
- FORGOT to read the recipe thoroughly before starting. Always double-check ingredients and steps.
- DUMPED the cheese mixture into the nuts without coating evenly. Press gently for better adhesion.
- OVER-TORCHED the nuts, resulting in a bitter flavor. Toast at medium heat, watch closely.
- MISSED the resting period, causing the cheese ball to be too soft to handle. Chill for at least 1 hour.
Quick fixes and pantry swaps
- When in doubt, splash a little hot sauce to brighten the flavor quickly.
- If the cheese mixture is too soft, chill for 15 minutes to firm up before shaping.
- Patch cracks with a little extra cheese mixture and re-roll for a smooth finish.
- When nuts are over-toasted and bitter, start with lightly toasted for a milder crunch.
- Shield the cheese ball from drying out by wrapping it tightly and refrigerating immediately.
Prep, store, and reheat tips
- Preparing the cheese mixture and shaping the ball can be done a day in advance; wrap tightly in plastic wrap and store in the fridge. The flavors develop overnight, making it even more flavorful.
- Store the assembled cheese ball in an airtight container or wrapped tightly in plastic wrap for up to 24 hours. The texture remains creamy, but it firms up slightly, so let it sit at room temperature for 15 minutes before serving.
- For longer storage, freeze the uncoated cheese ball for up to 2 months. Wrap it well to prevent freezer burn. Thaw in the fridge overnight before coating and serving.
- Refrigerated cheese ball will keep for about 3-4 days. The nuts may absorb moisture over time, so re-coat in nuts just before serving for best crunch.
- To reheat, serve cold or at room temperature. If you want it softer, let it sit out for 15 minutes, or briefly warm in a low oven (around 150°C/300°F) for 10 minutes. Watch for melting or oil separation.
Top questions about cheese balls
1. What does a cheese ball taste like?
A cheese ball is usually soft, creamy, and coated with nuts or herbs. When you bite into it, you’ll notice a rich, tangy flavor with a satisfying crunch from the coating.
2. How do I keep my cheese ball from falling apart?
To keep it firm, chill the cheese ball for at least an hour before serving. If it’s too soft, pop it back in the fridge for 20 minutes.
3. Can I make a cheese ball ahead of time?
Use room temperature cream cheese and shredded cheese for easy mixing. Cold ingredients will be harder to blend smoothly.
4. How long can I store a cheese ball in the fridge?
Yes, wrap it tightly in plastic wrap and refrigerate for up to 24 hours. It’s best to let it sit at room temperature for 15 minutes before serving.
5. Can I customize the coating nuts?
You can use any nuts you like—pecans, walnuts, almonds. Toast them first for a deeper flavor and crunch.
6. Can I make a dairy-free cheese ball?
Yes, you can swap cream cheese with mascarpone or a vegan cheese for different textures and flavors, though the taste and consistency will change.
7. What herbs work best in a cheese ball?
Adding herbs like chives or parsley brightens the flavor and adds color. Use fresh herbs for the best aroma and vibrancy.
8. How do I toast nuts properly?
Over-toasting nuts can make them bitter. Toast on medium heat for about 3 minutes, watching closely until fragrant and golden.
9. What if my cheese mixture is too soft or too stiff?
If the cheese mixture is too sticky, chill it for 15 minutes. If it’s too dry, add a splash of milk or cream cheese to loosen it.
10. How should I serve a cheese ball for best flavor?
When serving, let the cheese ball sit at room temperature for 15 minutes. This softens it slightly, making it easier to spread or scoop.
This cheese ball isn’t just a party snack; it’s a reminder that good times often come from messy, imperfect moments. When you pull it out, the aroma of toasted nuts and fresh herbs will fill the room, sparking conversations and smiles. It’s a simple dish, but one with the power to turn a casual gathering into a memory.
In the end, it’s about sharing something homemade and unpolished—something that invites everyone to dig in with no pretenses. Whether served at a casual get-together or a holiday feast, this cheese ball makes the moment feel a little more special, a little more real.

Hi, I’m Emma Collins, the recipe developer and writer behind Sailing With Seasons. I’m so happy you’ve found your way here. This blog is my celebration of seasonal ingredients, simple cooking, and the quiet joy that comes from preparing food with intention. Sailing With Seasons is where I share the recipes, lessons, and kitchen rituals that have shaped my life. It is a space built on curiosity, care, and a deep respect for real ingredients.


Leave a Reply